Saturday, February 26, 2011

Empty Pocket, Full Stomach, Happy Tastebuds!

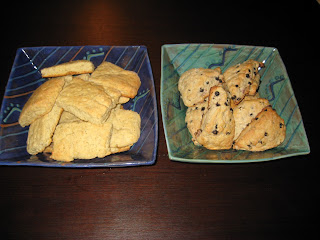
It happens to everyone, every now and then when its close to payday we all find ourselves "financial challenged". For me this is one of those times, so I decided that this week I would make something for which I had all or most of the ingredients already. I've always wanted to try scones, I decided to make two kinds: one sweet and one savoury. I started with the savoury, "Cheddar and Pepper Scones" http://www.epicurious.com/recipes/food/views/Cheddar-and-Pepper-Scones-102323.

The recipe calls for all-purpose flour but I had self-rising flour. One cup self-rising flour is equivalent to 1 cup all-purpose flour, 1 1/2 teaspoons baking powder and 1/4 teaspoon of salt. So I used the self-rising flour and adjusted the quantities of baking powder and salt. I sifted the dry ingredients together, grated some tasty cheddar cheese and cut the butter into pieces. Buttermilk is impossible to find in the grocery store in Jamaica so I made my own by adding 1 tablespoon vinegar to my measuring cup, topped it up with milk to the one cup mark and letting it stand for 10 minutes.

I got the helpful tips on flour substitution and making buttermilk from Joy of Baking http://www.joyofbaking.com/IngredientSubstitution.html.

I used my fingers to incorporate the butter and cheese into the dry ingredients until it was crumbly, then I added the pepper. I thought it could use more cheesy goodness so I added half a cup of grated parmesan cheese. Then I put it in the fridge for 1/2 hr.


I removed it from the fridge and added the entire cup of buttermilk to mixture, formed the sticky dough and spread it out on a big cutting board I coated with flour. Then I cut it the dough into 16 rectangles, brushed them with milk and put them in the oven for 15 minutes. I then removed them from the oven and set them to cool and after just a little while I took a taste. I loved the peppery taste and mmmmmm cheesy. I love cheese, nothing can ever be too cheesy for me. Next time I think I will add a dash of onion powder to the mix and I'll use a glass to cut the scones into rounds so they can be uniform.

Afterwards I got started on some Lemon and Dried Blueberry Scones http://www.epicurious.com/recipes/food/views/Meyer-Lemon-and-Dried-Blueberry-Scones-236780. These were made in pretty much the same way as the savoury scones with flour, butter, sugar, lemon zest and dried blueberries. I cut the batter into triangles and sprinkled sugar on top before putting them in the oven. These were done after 22 minutes in the oven.


When I took a bite, mmmmm, these were good too. Out of the all the ingredients I needed for these recipes the only one I had to buy was the dried blueberries and boy were they worth it. The combination of the blueberry and lemon, the crisp outside with the light fluffy inside and just the right amount of sweetness was sublime. With this recipe, I wouldn't change a thing and I can definitely see why its one of the top rated recipes on Epicurious.

So there you have it, 2 great batches of scones and all I had to buy was dried blueberries. Everything else used was already here, whether from previous recipes or just regular pantry items. A delicious and  budget friendly morning in the kitchen and a wonderful introduction to scones.


Wednesday, February 23, 2011

When life gives you lemons, make lemon poppyseed cupcakes!

This week is turning out to be a challenging week, yes, I know it just started but sometimes that's how it is. So I decided to break the normal weekend schedule and bake a lil something during the week. And whats a perkier dessert than cupcakes? Even the word itself is kinda cute, isn't it? I was in the mood for something fluffy with a citrus flavour and I came across this recipe http://www.bbcgoodfood.com/recipes/470636/lemon-and-poppyseed-cupcakes.

The poppyseeds were difficult to find but after visiting a health food store and a pharmacy that sells pretty much everything I stumbled upon a supermarket that had them as well as a few other things I will surely need in the future!


The first step was to combine the dry ingredients for the batter in a bowl. Then combine the wet ingredients in a separate bowl and finally to mix the wet and dry ingredients together. After that I filled my lined muffin pans and baked the muffins for 25 minutes. I checked the cupcakes after 20 minutes and had found that they were not done, so I extended the cooking time by 5 minutes after which they were perfectly done.


 As they cooled, I prepared the frosting using butter, lemon juice and icing sugar. Many of the reviews had commented that the quantity of icing produced by the recipe was too much and that the icing itself was too sweet. In order to avoid both these issues I used half the butter, half a lemon (my lemons were pretty large) and added sugar to taste.


After 5 minutes of cooling in the pan I moved the cupcakes unto my cooling rack. I allowed them to cool completely then it was to ice my cupcakes.


I tried using the cheap pastry bag and nozzles I bought at the store today but they wouldn't work for me for some reason. So I ended up just slathering the frosting onto the cupcakes with a rubber spatula which of course affected the overall appearance of my lovely lemony cupcakes.


When I tasted them, the airy, light lemony taste of the frosting was wonderful and apparent. It was certainly the star of the show. The cake itself was moist and not too sweet, but it was not as light and airy as I expected it to be and I feel as though the batter on top of having the lemon zest in it, could perhaps have benefited from some lemon juice.

Now after turning life's lemons into a lemony dessert, I'd better get some rest, because tomorrow is a whole, new, day.


Saturday, February 19, 2011

Breakfast On the Run

This weekend I'll be participating in the Sigma Corporate Run. It's a 5K run, walk and wheelchair event for charity. This year the charity is the Victoria Jubilee Hospital's Neo Natal Care Unit. This event made me think of something a little more healthy for this week's treat. Something I often grab and eat for breakfast, granola bars. I looked around my favorite recipe sites and found a recipe for Homemade Granola Bars by Ina Garten http://www.foodnetwork.com/recipes/ina-garten/homemade-granola-bars-recipe/index.html.


I followed the recipe with a few modifications. I started by toasting the coconut, almonds, oats and since I could only find raw wheat germ I toasted it also, for 12 minutes. After toasting I put the mixture in a bowl. I decided to omit the brown sugar since many of the reviewers thought the recipe was too sweet. I also omitted the butter to make the bars healthier. I measured the honey, salt and vanilla, put them in a bowl and added a 1/4 teaspoon of cinnamon. Then I measured the dried fruit and put them in another bowl. For the dried fruit I used 1/2 cup of Craisins and 1 cup of Sunmaid Fruit Bits (a mixture of dried fruit including raisins, apricots and apples).


Instead of boiling the honey mixture in a saucepan I microwaved it for a little over a minute then poured it over the oats mixture, added the bowl of fruit and mixed it thoroughly.


Then I placed in it a 12x8 pyrex dish which I lined with foil and sprayed with PAM for Baking. Since many of the reviewers indicated that pressing the ingredients into the dish was so important, I put my hand in a ziploc bag and pressed the mixture down with all my might. I then baked the granola for the full 30minutes.


 I wasn't going to wait several hours for the bars to cool so I could cut them, I was way too excited for that. So I put them in the freezer and in about an hour I cut it into 16 bars. There were a few crumbs (which I promptly gobbled down) but for the most part the bars stuck together which was a major concern for me because so many people said this was a problem for them in the reviews. The bars taste really good, nice and nutty, not too sweet, and just the right amount of fruit. The next time I make these, and there will be a next time, I'll probably double the cinnamon. I'd also like to try other dried fruits fruits and nuts. I calculated the nutritional information for each bar.

Nutritional Information: Calories = 194   Total Fat = 6g   Sodium = 37mg    Cholesterol = 0g   Total Carbs = 24g Protein = 4g

That's not too bad if you ask me. Now when I'm running out of the house in the mornings, I can grab one of these for breakfast with a cold glass of lowfat milk. Its also great for boosting my energy before evening dance rehearsals. I'll definitely be tweaking this recipe and I look forward to trying other granola recipes as well. I doubt I'll be buying these anymore.


Friday, February 18, 2011

Supermarkets and stress relief

So we've all heard of retail therapy, people who say that shopping makes them feel better but recently I've discovered that I find strolling through the aisles at the supermarket really relaxing. While shopping for this week's ingredients I found myself wandering all over just looking to see if they have random ingredients and equipment that I might need one of these days.I buy only what I came in there for but I browse extensively. "Oh, they have springform pans here, I'll keep that in mind when I'm going to make cheesecake" or "I wonder if cinnamon extract tastes better than ground cinnamon? I didn't even know they had cinnamon extract." These are the things that make a 10 minute trip to the store to buy this week's ingredients stretch to an hour. But, after getting lost in the aisles, I find myself relaxed and I've forgotten about the difficult day I had at work. I don't need to go buy shoes or clothes for my retail therapy, I simply take a trip to my favorite supermarket or wholesale club and window shop. Weird, funny, but hey, it works!

Monday, February 14, 2011

A Sweet for My Sweet

First of all, I'd like to wish all my readers a very Happy Valentines Day. Today marked the official beginning of my baking challenge. I baked my first dessert, my gift to my valentine.
  
I wanted to maximize the time my boyfriend and I would spend together today so I made the tart yesterday and quickly did the glaze this evening when I got home. Like many of the reviewers on Epicurious, I had difficulties finding chocolate graham cracker crumbs, so I used Teddy Grahams instead. I couldn't find the big box of them so I used 4 of the snack-sized packets. I had lots of fun  smashing them in a ziploc bag using the flat side of a meat tenderizer. Then I made the crust. If I ever make this recipe again, I would use 1.5-2 times the amount of crust ingredients because I found that the recommended amount was not enough to get the nice crust in their picture. I baked the crust and set it to cool.


The hardest part of the recipe was actually chopping up the chocolate I had bought. I got it from a baking store that buys a large quantity of chocolate and cuts it up, selling it by weight. The blocks were hard to cut, but after that, I couldn't believe how easy my first tart was. After combining all the ingredients and baking it, I set it to cool.


The tart developed bubbles in it while it was baking so the top didn't end up as smooth as I had anticipated. Still, it looked pretty delicious and I was beaming with excitement and pride. I tucked it in the fridge overnight.

Today when I got home, I allowed it to get to room temperature, made the glaze and applied it to the tart.


After eating a sumptuous dinner prepared diligently by my bf, it was my turn to serve my dessert. I chose to serve it with a little whipped cream.


And guess what? It was deeeeeeeelicious!! Smooth, rich, creamy and ultra chocolaty. So it wasn't completely perfect. It didn't look exactly like the picture but it was a delectable end to a wonderful dinner, my valentine loved it and it was certainly fun. I can't wait to try something new next week. If you'd like to try out the recipe yourself, here's the link http://www.epicurious.com/recipes/food/views/Chocolate-Glazed-Chocolate-Tart-243610

Oh, and to all my friends who read my blog, feel free to come grab a slice. Tony and I are stuffed! 

Wednesday, February 9, 2011

Recipe Found!

After many nights of scouring websites to find the right recipe for this weekend I found it! I'll be making a Chocolate Glazed Chocolate Tart which I found on Epicurious http://www.epicurious.com/recipes/food/views/Chocolate-Glazed-Chocolate-Tart-243610 .

I choose recipes like I choose books to read. I get to Amazon and head straight for the New York Times Bestsellers section. After all, if a large amount of people have bought and read the book it stands a better chance of being good right? Then I look at the reviews. Anything under 4 stars is immediately dismissed. Only 4 stars and up for me! And of course I make sure that a decent amount of people have rated the book. If one person gives the book 5 stars, it really isn't representative of the quality of the book. Its one person's opinion and that person could be the author's mom.

Similarly, when combing websites for great recipes, I look for ones with high ratings, or staff favorites with lots of reviews and comments and if I have enough time, I'll even read through most of the comments and see what people say. This is where you find out about mistakes in the recipes or difficulties with the instructions. This is probably one of the reasons why it took me some time to pick this recipe for this weekend. The other reason is that this is not just any dessert on a regular weekend, this is the weekend before Valentines Day and this particular dessert is my gift to my valentine. So I want it to be perfect.

And now that I have the recipe picked out, I'm getting really excited about my first conquest. I can't wait for the weekend to come so I can get in the kitchen and get started!

The Challenge

I recently came up with an idea, not an original idea but a good one all the same, to make a dessert every weekend and chronicle the experience with this blog. The challenge will begin this coming weekend and end 6 months later on the weekend of August 13th. I will take the recipes from everywhere and anywhere, cookbooks, the internet, the paper, anywhere I can find one that interests me. I will make cakes, tarts, cookies, all types of baked goods. My hope is that during this time I will learn lots about baking, and most importantly, have fun. 

In order to make sure my boyfriend and I don't gain a gazillion pounds from eating whole cakes and pies each week, I will be sharing these treats with my closest friends and invite them to  drop by on Sundays and indulge. 

My first, very important assignment is to make a Valentines Day dessert for my boyfriend who happens to be a chocoholic, so I'm spending my time combing through recipes to find the absolute perfect chocolate dessert for this special day. 

I hope you'll enjoy reading about my successes and challenges as I try to unleash the baker within.